A Mobile Camera at the Service of Vehicle Safety.
Next to economy and design, vehicle safety is among the most important criteria in purchasing a car. This is one of the reasons car manufacturers have recently aggressively stepped up their efforts in the area of safety. The BMW Group is using its innovative photogrammetric 3D measuring system
V-STARS from Geodetic Systems, Inc. (GSI) for measurements before and after the test in its Crash Test Center.
The vehicle safety subject enjoys top priority in the automotive industry. And the BMW Group that carries out 5-7 crash tests a week on a 135 m-long stretch in its Crash Test Center that opened in Munich in 2005 is no exception. Among the main tasks of the Test Passive Safety Department is the deformation analysis of crash vehicles. As part of this program, the crash specialists carry out comparative measurements on the test vehicle based on legal, consumer protection and development specifications before and after the test. The most modern technologies are used such as V-STARS from GSI a measuring system that is already used frequently, in particular for aerospace applications, and is also steadily gaining ground in the automotive industry, but otherwise is relatively little known in the industry in Europe.
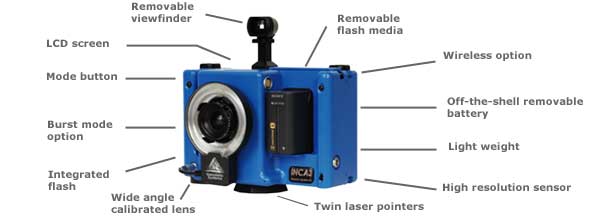
At the heart of V-STARS is the INCA3, the third generation of the INtelligent CAmera (INCA), a highly-developed photogrammetric digital camera with unsurpassed performance and accuracy. The INCA3 is the smallest and lightest measurement camera that GSI has ever built. Compared to the market-leading predecessor model INCA2, the new camera is only half as big and weighs half as much. The built-in computer and the integrated flash make the INCA3 in conjunction with a wireless network (WLAN) a unique high-end system on the photogrammetric market, designed for rugged industrial use.
Roland Kinzel, managing director of GDV Systems GmbH in Bad Schwartau, the sales partner of GSI for German-speaking countries, takes a look back: Until the end of the 90s, measurements by crash test experts were performed with a stationary 3D coordinate measuring machine. This was too time-consuming, however, since the vehicle had to be lifted onto the CMM and laboriously aligned. With the acquisition of a new mobile 3D measuring system without any bulky appliance, efficiency in the test area should be considerably improved.
In order to find the system best suited for measuring tasks, the BMW Group conducted a comprehensive benchmark, with the eventual winner being V-STARS. The strongest point in favour of the system was the fact that it was high-tech. While there was competing equipment that was less expensive, the safety experts looked primarily at reliability and user-friendliness. This is what they expected from V-STARS and their decision has been proven right over the past seven years. Other factors in the system's favour were the quality of the camera, the flexibility and the speed.
Since 1999 the car manufacturer has been using V-STARS with INCA1 cameras, followed by the purchase of the current INCA3 system at the end of 2005. The goal the people in Munich are trying to achieve with
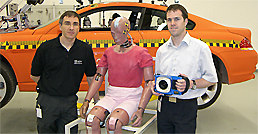
V-STARS is to measure points all around the vehicle with an accuracy of better than 1 mm and as efficiently as possible. Andreas Huber of the BMW Group explains how a test crash works: The preparations begin as early as 10 days before the actual test by preparing the car in the rigging workshop where a number of sensors are fitted into the vehicle, the parts stand is checked and set up based on the planned test. Technical components such as camera stands, lighting and data acquisition systems are installed on and in the vehicle. One day before the test, the vehicle is moved to the test facility area where pre-measurements are performed with V-STARS. Immediately after the crash test the vehicle deformed from the crash is returned and post-measurements are made photogrammetrically. The entire outer skin of a car in the development stage is measured. Before the test, the crash test experts mark between 80 and 100 measuring points on the unharmed vehicle using very fine prick-punches. These are distributed around the chassis from the roof over the side panels, from the engine room into the trunk, and all the way to the entire underbody. The point size of the markings, incidentally, is so small, that it can be perfectly digitized with the hand-held point probe. There are also many details hidden in the underbody that could not be detected without a probe. The interesting points are recorded for each vehicle in a measuring-point catalogue. Depending on the type of test side, front, rear or rollover these points are then attached. The V-STARS system is used daily for measuring 1-2 vehicles a day, before and after the test, in other words up to four times a day.
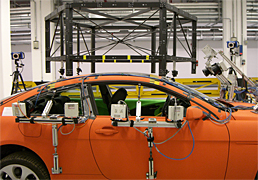
Fig 1: Thanks to the reference frame on the |
|
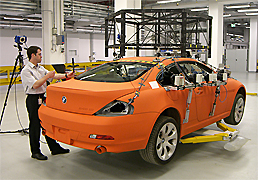
Fig 2: The BMW Group uses the flexibility and the large measurement volume of the optical system for solving the measuring tasks at hand. |
There is an interesting crossover between the actual test and simulation which also displays the tests and is housed in the same department, ensuring direct information flow. The crash testers supply data from the real test, and simulation takes care of the respective adjustments. Therefore, if an order is received for a crash test, it is possible to perform it virtually, using simulation, or via the hardware. One could say that the simulation can be calibrated using the data of the real measurements. This means that the simulation models and results are also validated by the data from the actual test.
Under these circumstances it is not surprising that V-STARS has absolutely proven itself at the BMW Group and has met the expectations of the car manufacturer. The INCA cameras work accurately and reliably without any significant downtimes; the INCA1 has done so for seven years already. The system is impressive due to its large measurement volume and small space requirement: 3D-capture of measuring points on the outer skin of the vehicle, the underbody and the interior takes place in minimal setup time of only one or two positions. Another plus is the easy handling of the mobile measurement system, especially the software. The effort of training people in the use of V-STARS is manageable it can be done within a few days. The time advantage is also apparent in daily use: Pre-measuring 80-100 points on the vehicle by one person takes about 90 minutes, and post-measuring, roughly 60 minutes. If a coordinate measuring machine were used, a whole day or at least 4-6 hours would have to be set aside to perform the same tasks ...
The crash experts of the BMW Group are also favourably impressed by the support GDV Systems provides in particular because of the short reaction times and the intensive on-the-job training,' directly at the measuring object. But above all, V-STARS makes it possible for the crash testers to quickly and reliably measure points around the entire vehicle. Even though the BMW Group doesn't even come close to exhausting the unique, high measuring accuracy of the system, all other advantages of V-STARS such as the flexibility and the high measurement volume are used to the fullest extent for elegantly solving the measuring tasks at hand.
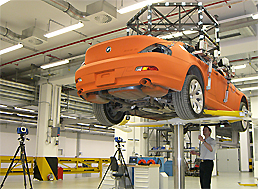
And we must not forget to mention one clever idea from the crash test department of the BMW Group: the calibrated reference frame on the roof of the car is used to precisely orient the sensor. Therefore, no reference marks have to be placed on the vehicle itself. The rack on the roof allows the vehicle and camera to be freely positioned while the measurement is carried out on a rotatable single-column lifting platform. This lift' can also be raised to allow the underbody to be measured without having to recalibrate, provided that there is no change to the reference frame. During pre-measurements we place this handy rack on the respective vehicle and digitize the required points. An average of 80-100 measuring points are input into the vehicle network and provide us with the opportunity during post-measurements to select those points that, in our opinion, sustained the least amount of deformation, and are suitable for making both measurements coincide, adds Andreas Huber.
Fig 3: The lifting platform can be raised and the underbody measured without the need for recalibration by the part of the crash experts. |
|
|
The INCA3 camera
The INCA3 camera, specifically designed and built by GSI to perform high accuracy 3D measurements, combines a proven ultra-high-resolution CCD sensor with an on-board PC based industrial computer to perform measurements in harsh conditions and unstable environments. In order to obtain such performances, GSI imposes not only an unsurpassed opto-mechanical stability inside the camera but also features such as an integrated strobe, or wireless (WIFI) connectivity after a typical ten-to-one image compression.
The confined aspect of the measurement environment of the corners fitting at Airbus is interesting for the
V-STARS system. However, the INCA3 camera is particularly well-suited for in-place measurements of large objects since there is no size restriction of the part to be measured. That makes it possible for V-STARS systems to be used in fields such as Aeronautics, Space, automotive, shipbuilding, power generation, heavy industry, etc
Once INCA3 captures photos (either via hand-held operation or remote control), GSI's proprietary V-STARS software automatically inspects the collected digital images and extracts the required 3D data. This process is fully automated. The measured points can then be compared to their nominals (either point by point or compared to the relating CAD file) or compared to previous measurements (repeatability or capability studies).
INCA3:
What is Metrology? What is Photogrammetry?
The science of measurement is known as the field of metrology. Engineers, manufacturers, scientists, and quality control technicians utilize measurement technology in their own unique disciplines.
About NTI
NTI manages all aspects of GSI's V-STARS activities in Europe.
About Geodetic Systems, Inc.
Geodetic Systems, Inc. (GSI, www.geodetic.com) is an international supplier of industrial photogrammetry solutions for the industrial measurement/metrology marketplace. GSI develops and markets the V-STARS family of 3D coordinate measurement systems for users involved in measurement and inspection applications in diverse industries such as aerospace, nuclear power, automotive and shipbuilding. INCA3, the company's flagship product, is a state-of-the-art digital photogrammetry camera with many progressive features. GSI distributes its products via a worldwide network of industry partners. The V-STARS systems and the INCA3 camera's distribution in Europe is coordinated by NTI.
For further information contact:
32 route de Seichebriéres
Tel. +33 (0) 2 38 59 30 51 / Fax: + 33 (0) 2 38 59 30 97
Cellular: +33 (0) 6 83 70 89 79
E-mail: nicolas.tanala@v-stars3d.com, website: www.nti-measure.com
__________________________________________________________________________________
INCA3, V-STARS, Picture Perfect Measurements are trademarks or registered trademarks of Geodetic Services, Inc. All other brand and product names are trademarks or registered trademarks of their respective owners.
