Photography - The First Part of Photogrammetry
Metrology - The Second Part of Photogrammetry
OO
Questions You Should Ask: Remember "V-STARS"
Initial and Repeat Measurements
Completely or Partially Overlapping Measurements
Planning for Different Types of Measurements
Design for Completely Overlapping Measurements
Design for Partially Overlapping Measurements
Design for "Left-Right" Measurements
Design for "Front-Back" Measurements
Procedures for Different Types of Measurements
Planning Summary and Checklist
Retro-reflector Targets and Their Characteristics
Individual self-adhesive stick on targets
Photogrammetry
Basics of Photogrammetry
Before describing the operation of the V-STARS system, a brief introduction to photogrammetry is provided for those who are unfamiliar with the technology. Photogrammetry , as its name implies, is a 3-dimensional coordinate measuring technique that uses photographs as the fundamental medium for metrology (or measurement).
The fundamental principle used by photogrammetry is triangulation. By taking photographs from at least two different locations, so-called "lines of sight" can be developed from each camera to points on the object. These lines of sight (sometimes called rays owing to their optical nature) are mathematically intersected to produce the 3-dimensional coordinates of the points of interest. Triangulation
is also the principle used by theodolites for coordinate measurement. If you are familiar with these instruments, you will find many similarities (and some differences) between photogrammetry and theodolites. Even closer to home, triangulation is also the way your two eyes work together to gauge distance (called depth perception).
This primer is separated into two parts. Photography describes the photographic principles involved in photogrammetry, while Metrology describes the techniques for producing 3-dimensional coordinates from two-dimensional photographs.
Photography
Photography - The First Part of Photogrammetry
Taking photographs is, of course, essential for making a photogrammetric measurement. To obtain the high accuracy, reliability and automation the system is capable of, photographs must be of the highest quality. Fortunately, because of the design of the system, photography with
V-STARS is actually simpler than film photography.
The three main considerations for good photography are:
2. Focusing
3. Exposure
Field of View
|
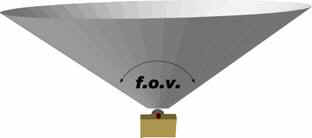
The camera's field of view defines how much it sees and is a function of the focal length of the lens and the size (often called the format) of the digital sensor. For a given lens, a larger format sensor has a larger field of view. |
|
|
Similarly, for a given size sensor, a shorter focal length lens has a wider field of view. The relationship between format size, lens focal length and field of view is shown below. |
|
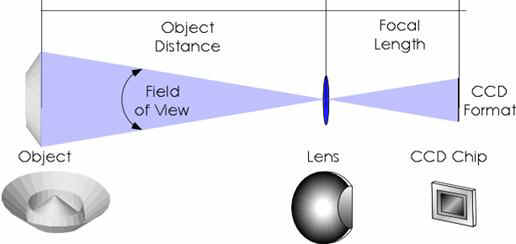
The standard lenses available with V-STARS are so-called medium angle lenses and have about 50° wide fields of view. The wider the field of view, the more you see from a given location. For a medium angle lens, a convenient rule of thumb is that you will generally need to get back as far from the object as the size of the object. For example, you will get about three meters (ten feet) back to see a three-meter (ten foot) object.
In general, there is a tradeoff between the field of view of a lens and accuracy. Although wider-angle lenses need less room around the object, they also tend to be less accurate. (The reasons for this are beyond the scope of this introduction.) Thus, you generally want to use the longest focal length lens you can. The medium angle lenses provided with V-STARS represent a good compromise between field of view and accuracy.
Focusing
One consideration for normal photography is, of course, focusing the lens so the image is sharp. The range of acceptable sharpness is called the depth of focus. The depth of focus of a lens is a function of many factors, including: the focal length of the lens, the format size, the distance from the camera to the object, the size of the object, and the f-number of the lens. As you can appreciate from all the factors listed above, the depth of focus can be a complex function.
V-STARS has been designed so that images will be in acceptable focus for points between 0.5 meters (20 inches) and 60 meters (200 feet) from the camera. Fixing the focus effectively eliminates the depth of focus problem.
Exposure
Camera Exposure
For photogrammetry purposes, it is desirable to set the targets bright and the background dim. When retro-reflective targeting is used, the target and background exposures are almost completely independent of each other. The target exposure is completely determined by the flash power while the background exposure is determined by the ambient illumination. The amount of background exposure is controlled by the shutter time.
Eliminating the background exposure makes the targets easier to find and measure. However, if there is no background image whatsoever, trying to figure out which target is which can be difficult. Usually, a compromise is reached and the background exposure is set so the object is dim enough to not interfere with target measurement, but still bright enough that it can be seen when enhanced.
Background Exposure
The shutter time is used to control the background exposure. When the camera is off-line, the shutter time is selected using the mode switches that are located on the top of the camera next to the display. The available shutter times on an INCA2 range from 8 milliseconds to 8 seconds.
The INCA2 camera has an AUTO Exposure feature that can be used to automatically set the shutter speed. The default setting is to use the AUTO Exposure. If AUTO Exposure is selected, the shutter exposure is set automatically the first time you take a picture on a job.
Target Exposure
The flash power setting for the target exposure depends on the distance from the camera to the targets, and the target size.
The following diagram gives recommended flash power settings at varying distances. If you are shooting the object in sections, use the size of the sections. The tables assume the recommended target size (which is also listed) is used. If the targets are smaller than this, you may want to increase the flash power setting one step to help compensate.
The tables assume the default lens f-number of F11 is used with an INCA. It is important to check the lens and make sure it is set to f11, the default setting for the lens.

Metrology
Metrology - The Second Part of Photogrammetry
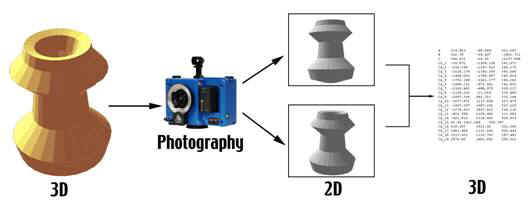
Photography in its broadest sense is a process that converts the real 3-dimensional world into flat 2-dimensional images. The camera is the device that makes this transformation or mapping from 3 dimensions to 2 dimensions. Unfortunately, we cannot map the 3-dimensional world onto two dimensions completely some information is lost (primarily the depth).
Photogrammetry
in its broadest sense reverses the photographic process described above. It converts or maps the flat 2-dimensional images back into the real 3-dimensional world. However, since information is lost in the photographic process, we cannot reconstruct the 3-dimensional world completely with just one photograph. As a minimum, we require two different photographs to reconstruct the 3-dimensional world. If this process was perfect, the two photographs are more than enough information to perfectly reconstruct the 3-dimensional world they represent. Unfortunately, the photography and measuring process is not perfect so the reconstruction of the 3-dimensional world is also imperfect.
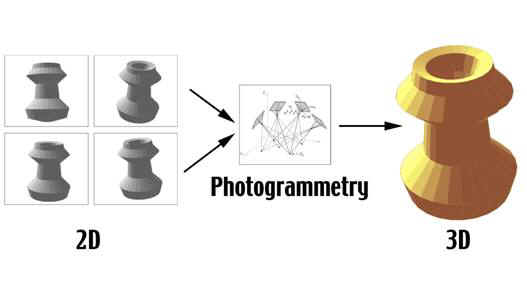
However, we can take more photographs and use the extra information in them to improve the process. The 3-dimensional coordinates we produce from the measurements of multiple photographs are the end result of photogrammetry.
Photogrammetry
uses the basic principle of Triangulation
, whereby intersecting lines in space are used to compute the location of a point in all three dimensions. However, in order to triangulate a set of points one must also know the camera position and aiming angles (together called the orientation) for all the pictures in the set. A process called Resection
does this. Finally, because the V-STARS camera is a precision measuring instrument, it must be calibrated so its errors can be defined and removed. One of the most powerful features of V-STARS is its ability to produce this camera calibration as a byproduct of the measurement in a process called Self-calibration.
Although each of these techniques is best described separately, they are actually all performed simultaneously in a process called the Bundle Adjustment.
Triangulation
Triangulation
is the principle used by both photogrammetry and theodolites to produce 3-dimensional point measurements. By mathematically intersecting converging lines in space, the precise location of the point can be determined. However, unlike theodolites, photogrammetry can measure multiple points at a time with virtually no limit on the number of simultaneously triangulated points.
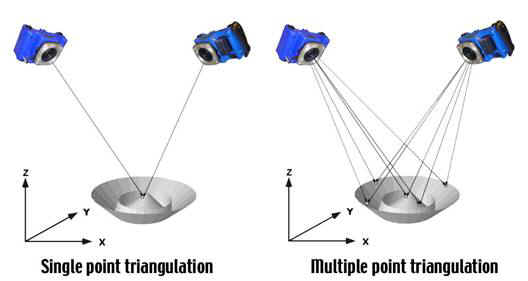
and measuring the same target in each picture a "line of sight" is developed from each camera location to the target. If the camera location and aiming direction are known (we describe how this is done in Resection ), the lines can be mathematically intersected to produce the XYZ coordinates of each targeted point.
Resection
Resection
is the procedure used to determine the final position and aiming (called the orientation) of the camera when a picture is taken. Typically all the points that are seen and known in XYZ in the image are used to determine this orientation.
V-STARS uses the AutoStart
or SuperStart
operation to get the preliminary camera orientation. This orientation is based on the AutoBar
or any known coded targets.
For a strong resection, you should have at least twelve well-distributed points in each photograph. If your measurement does not have this many points, or they are not well distributed, it is recommendable to add points. Points that are added to strengthen the solution are called "fill-in" points.
If the XYZ coordinates of the points on the object are known (we describe in Triangulation
how this is done), we can compute the camera's orientation. It is important to realize that both the position and aiming direction of the camera are needed. It is not sufficient to know only the camera's position since the camera could be located in the same place but be aimed in any direction. Consequently, we must know the camera's position which is defined by three coordinates, and where it is aimed which is defined by three angles. Thus, although three values are needed to define a target point (three coordinates for its position), we need six values to define a picture (three coordinates for position, and three angles for the aiming direction).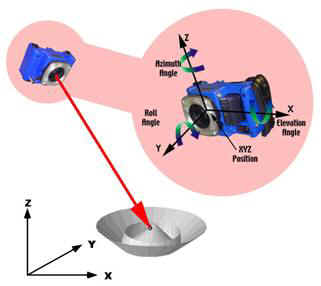
Self-Calibration
Although the cameras and lenses used in the V-STARS system are of the highest quality, they must still be precisely calibrated to remove errors that are present in the system. Some of these error terms can be described in terms of their physical cause while others are more empirically derived. In any case, all of these error terms are automatically solved for by V-STARS along with the XYZ coordinates of the target points and the orientation (position and aiming angles) of each picture in a process called the Bundle Adjustment.
This ability to calibrate the camera as a byproduct of the measurement is called Self-calibration and it means the camera will be calibrated at the time of measurement, and under the environmental conditions that exist (temperature, humidity, etc.) at the time of measurement. This is far superior to relying on an old and possibly outdated laboratory calibration that may have been done under dramatically different conditions than existed at the time of measurement.
|
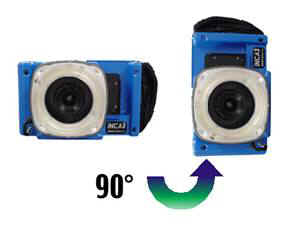
There are certain requirements that must be met in order to self-calibrate a camera, but they are usually easy to do. First, the measurement must have what is called roll diversity. This usually means you must take some photographs with the camera horizontal and some photographs with the camera vertical. |
|
Although you will get better results if you take about half of your shots one-way and half the other, this is not critical. What is critical is that you must have at least one picture that is rolled approximately 90° differently than the others.
If you do not, you cannot self-calibrate the camera. Instead, you will have to rely on a pre-existing calibration that is less reliable and less accurate.
A second requirement is that you must measure a minimum number of photographs taken from a minimum number of different locations. You should measure at least six photographs if the object is two-dimensional (the object is essentially flat) or four photographs if the object is three-dimensional. Also, the photographs should be taken from at least three different locations. Since most jobs will take at least this many photographs there is usually no reason not to self-calibrate the camera. In fact, we strongly recommend that you always take enough photographs to self-calibrate the camera because it is so quick and easy to take and measure extra photographs.
A final requirement is that you must have a minimum number of well-distributed points on each photograph and for the entire measurement. Specifically, you should have at least twelve well-distributed points on each photograph, and at least twenty points for the entire measurement. Well-distributed means the points are distributed fairly evenly throughout the photograph. It is much better for example to have twelve points distributed evenly throughout the picture than to have fifty clustered together in one small area. If you do not happen to need this many points for the measurement or they are not well distributed, we recommend you add points to the measurement. As you will see, it is very quick and easy to add extra points to the measurement so feel free to do so.
Bundle Adjustment
The Bundle Adjustment is the program that processes the photographic measurements to produce the final XYZ coordinates of all the measured points. In order to do this, it must Triangulate the target points, Resect the pictures and Self-calibrate the camera. The Bundle Adjustment program is called STAR, which stands for Self-Calibration , Triangulation and Resection.
The real power of the bundle adjustment is that it is able to do all three of these things simultaneously. If you review the descriptions of Triangulation and Resection, it appears there is a problem. In order to triangulate the measured points, we must know the orientation of the pictures.
However, in order to orient the pictures, we must know the coordinates of the measured points. How do we get started here? The answer is the bundle adjustment has the capability to figure them both out simultaneously and to self-calibrate the camera as well! This is where the name bundle adjustment comes from because it bundles all these things together and solves them all at the same time.
The Bundle Adjustment
does need a little help though. It must have the preliminary orientation for each photograph in order to get started. This preliminary orientation is accomplished with the AutoStart
or SuperStart
procedures that are done for every photograph.
When STAR is finished it then produces the following:
1. XYZ coordinates (and accuracy estimates) for each point
2. The XYZ coordinates and 3 aiming angles (and accuracy estimates) for each picture.
3. The camera calibration parameters (and their accuracy estimates).
Measuring Accuracy
V-STARS in the single camera mode provides accuracies comparable to those achieved by other large volume, high accuracy coordinate measurement systems such as Digital Theodolites,
Co-ordinate Measuring Machines (CMMs), and Laser Trackers. Typical accuracies are 20 to 40 microns (0.001" to 0.002") on a 3-meter (ten foot).
However, the accuracy of a photogrammetric measurement can vary significantly since accuracy depends on several inter-related factors. The most important are:
1. The resolution (and quality) of the camera you are using,
2. The size of the object you're measuring,
3. The number of photographs you're taking, and
4. The geometric layout of the pictures relative to the object and to each other.
The diagram below illustrates the effects of the four factors and their influence on accuracy.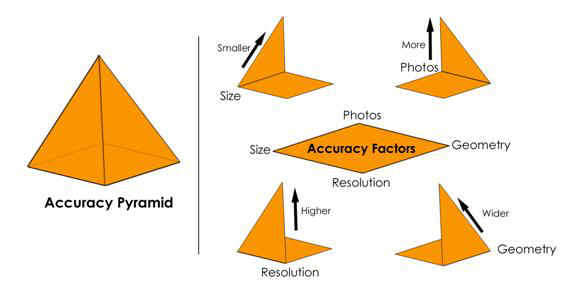
The diagram represents a pyramid with the four factors at the base of the pyramid and high accuracy at the top of the pyramid. To get higher accuracy ( a higher pyramid) you need more of the items shown on the lines of the pyramid (higher resolution, smaller size, more photos, and wider, but not too wide, geometry). See - "How Accurate is V-STARS?" (in the FAQ i.e Frequently Asked Questions) for a more detailed description of each of these factors.
Scaling Photogrammetry
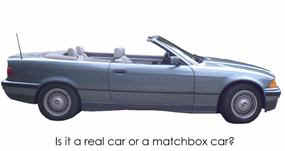
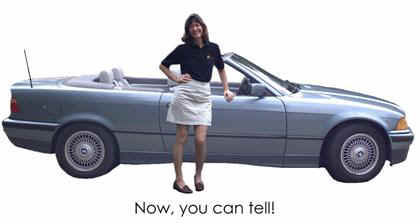
Photogrammetric measurements are inherently dimensionless. An example of this is shown below. The picture of the first car could be a picture of a full-size car or of a matchbox model; there is no way to tell. However, if we know the size of something that is also in the picture, we can now say something about the size of the car. (Theodolites are another inherently dimensionless technology).
|
To scale a photogrammetric measurement, we must have at least one known distance. If we know the actual coordinates beforehand of some targeted points, we can compute the distances between these points and use these to scale the measurement. |
|
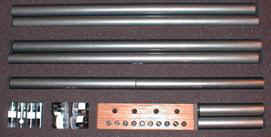
Another possibility is to use a fixture with targets on it and measure this along with the object. The distance between the targets on the bar is known and can be used to scale the measurement. Such fixtures are commonly called scale bars.
See also Attaching the Scale Bar (s), and the questions in FAQ regarding scale.
Multiple Scale Distances
When scale bars are used, one good technique is to use a bar that has more than two targets. Another technique is to use more than one scale bar. Alternatively, you can use both techniques. It is up to you, but, whenever possible, you should use multiple scale distances.
Long Scale Distances
The scale distance(s) should be as long as practical because any inaccuracy in the scale distance(s) is magnified by the proportion of the size of the object to the scale distance. For example, if a one meter (40") scale distance is used on a 10 meter (400") object, and the scale distance has 0.1 mm (0.004") of error, then the object will have ten times this error, or 1mm (0.040").
In some cases, a measurement may not need to be precisely scaled. For example, some surface or shape measurements do not require accurate scale. In this case, you can use nominal distances to provide scale or you can use the AutoBar
for scale. However, the AutoBar is too small to accurately scale a measurement.
Measuring
Measuring with V-STARS
No matter what kind of measurement you are doing, measuring with V-STARS usually consists of the following steps.
1. Planning the Measurement
2. Targeting the Object
3. Taking Pictures
4. Measuring Pictures
5. Processing Pictures (to get 3-dimensional coordinates)
6. Analyzing the Results (manipulating the results to help check and visualize the results)
The list above is a general guide. However, every measurement project is different, and therefore the content and even sometimes the order of the steps given above may be different depending on the project requirements and sometimes operator preference. For example, on some projects, you will take all pictures first (to minimize time on-site typically) and then measure them, while on others you will measure each picture after it is taken. On other projects, you will take and measure some pictures, and then process them to get preliminary results so you can make measuring the remaining pictures easier. Still, all the steps listed above are carried out in some fashion on every project. Each of these steps is described in detail in the following chapters.
Planning the Measurement
Proper planning is essential for making a successful measurement. This is especially true if the measurement is complex or if it is the first time, you have done this particular type of measurement. To plan properly, you must have information about the measurement. Use the following list of questions to help you plan the measurement.
Questions You Should Ask: Remember "V-STARS"
Visibility - Can the points of interest on the object be seen? Remember that V-STARS is a "line of sight" technology based on triangulation. That means the points must be seen from at least two different locations to be measured. For higher accuracy, the points should be seen from very different locations and from more than just two locations. (See Measuring Accuracy for more details on how geometry and the number of photos affect accuracy).
Also, remember that V-STARS never measures the points of interest directly. Instead, V-STARS measures retro-reflective targets that are placed on, or in a known relationship to, the points of interest. If a point of interest cannot be seen directly, often some form of offset target can be devised to measure the point indirectly.
Size and Shape - What is the size and shape of the object? The size and shape (convex, concave, single-sided, multiple sided, etc.) will determine how complex the measurement will be, how much room you will need around the object, and the level of accuracy you can obtain. The size and shape will also determine what type and size of targets will be used.
Targeting - Can the points of interest on the object be targeted? If they cannot, you must use another method (V-STARS in the multiple camera mode using the touch probe for example, See the V-STARS/M manual for details). Targeting the object to obtain the measurements you desire can often be one of the most challenging and time consuming aspects of a project. See Targeting for more information.
Accuracy - What level of accuracy is desired or required? Notice the terms desired and required are both used. It is important to distinguish what level of accuracy is wanted and what level of accuracy is acceptable. Taking more pictures can increase photogrammetric accuracy significantly. It is important to realize that this accuracy improvement will reach a diminishing point of return.
This tradeoff must be considered when deciding how many photographs to take. See Measuring Accuracy for more details on the factors (including the number of photographs) that affect accuracy.
It is also important to define the level of accuracy in a clear and unambiguous way. There are many ways of specifying accuracy. For example, is the accuracy specified an absolute range (meaning no value should be outside the entire range) or is it an RMS
value (meaning, on average, 67% of the values will be within plus or minus the accuracy specification).
Room - How much room is there around the object? This question relates to visibility again. The amount of room around the object will determine if the project is even feasible, and if it is, will determine to some extent the number of photographs you take. Remember that for the standard medium angle lens provide with V-STARS, the rule of thumb is you will see about as much of the object as your distance back from the object. For example, if you are 3 meters from the object you can see about 3 meters of the object. If there is not enough room to see the entire object in the photograph, you can still measure the object by photographing it in overlapping sections (this technique is called mosaicing) but this makes the measurement more complicated.
Scale - Will scale be used? If so, how will it be applied to the object? Although this may seem a bit trivial at first, figuring out where to put the scale bar(s) so they do not block targets or are themselves blocked can be one of the more challenging aspects of a measurement. Add in the fact that it is desirable to have the scale bar be about the length of the object you are measuring, and that it must be rigidly attached to the object, and that if scale is important then we recommend using multiple scale distances, and this seemingly trivial task can sometimes be downright daunting. See Scaling Photogrammetry
, and the questions on scale in FAQ.
Defining a Coordinate System
|
All coordinate measurement systems must use some working coordinate system. V-STARS automatically defines a local coordinate system that uses the coordinate system defined by the first picture you measure. If the AutoBar
is used, the V-STARS measurement is in the coordinate system defined by the AutoBar. |
|
This is shown in the adjacent image. If an AutoBar
is not used, V-STARS uses the coordinates system on the driver file you have selected. In either case, all the images and measurements are then defined in the local coordinate system. Typically, this local system is not usually the final coordinate system desired by the user.
Your plan must include a way to define the user coordinate system you desire. In some cases, the local coordinate system defined by V-STARS is sufficient. In other cases, you must transform this local system into the desired user coordinate system. This transformation can be automatically done for you by V-STARS using design data, or you can use the WINTRANS program provided with V-STARS.
Coordinate systems are also called axis systems since the coordinate system is often defined by aligning certain points to the coordinate axes. In this document, coordinate system and axis system are used interchangeably and mean the same thing.
Measurements
Types of Measurements
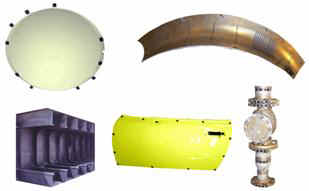
Photogrammetry is a versatile, powerful, and flexible measuring technology. Measurements have been done on land, sea (and undersea), and air, and even in outer space on objects smaller than a football to larger than a football field.
|
Photogrammetry is widely used in the aerospace, antenna, shipbuilding, construction, and automotive industries for a wide variety of measurement tasks. |
|
Although every photogrammetric project is somewhat different, we have separated them into broad categories to help describe general approaches for performing a successful measurement.
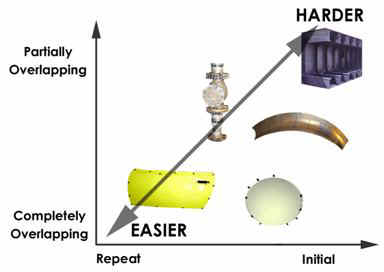
Initial and Repeat Measurements
A repeat measurement is one in which approximate coordinates are available for all (or nearly all) of the target points, while for an initial measurement there are no approximate coordinates available. In general, these coordinates are available from an earlier measurement of the object (hence the name repeat measurement), but they can also be from a set of design coordinates. All that matters is that they are accurate enough to allow the software to correctly measure all the targets on each photograph. Then, after each photograph is oriented (using the AutoStart
or SuperStart
procedure), we can use a process called driveback to quickly and automatically find and measure all the visible points. To use driveback, the coordinates should be much more accurate than the closest target spacing. Therefore, if targets are 100mm (4 inches) apart, the coordinates' accuracy should be much better than this, say better than 25 mm (1 inch). The better the approximations are, the faster and easier the measurement will be.
If no approximate coordinates are available, you can use the AutoBar
provided with the system to do an initial measurement. With the AutoMeasure command, initial measurements are now nearly as fast and easy as repeat measurements.
Completely or Partially Overlapping Measurements
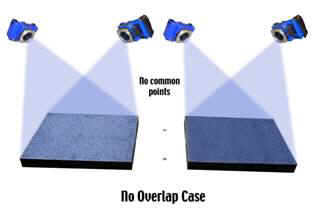
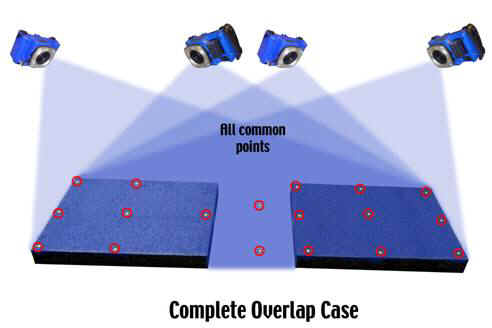
A completely overlapping measurement is one in which the entire object is seen in every photograph, while in a partially overlapping measurement, the object must be photographed in sections (because of space limitations or accuracy requirements or because of the complexity of the object). Partially overlapping measurements must have sufficient common coverage to hold (or "tie") the entire measurement together as a unified whole. The need for common coverage among photographs is described with the help of the figures below.
|
In the first figure, we have two completely independent measurements of two flat panels. Each of the panels is very accurately measured, but since there is no common coverage, we can say nothing about the relationship between the two panels. |
|
For example, we cannot even say how far the panels are from each other or how they are oriented to each other.
If we now measure the panels with enough partial overlap that a line of points is seen in common between the two panels, we have now connected the two panels together but not with sufficient overlap to completely determine the relationship between the two panels.
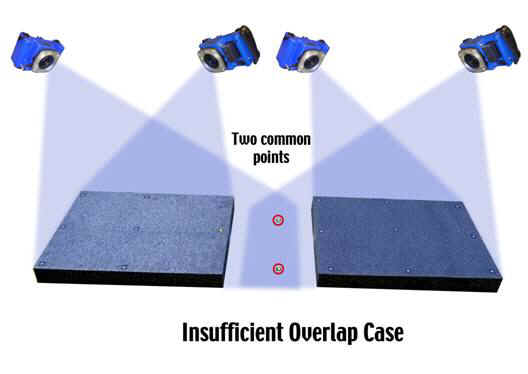
The common line only acts like a hinge, the two panels are connected there but they could be at any angle to each other that this "hinge" connection allows. Therefore, the overlap must be more than just a line of points; it must be at least two-dimensional.
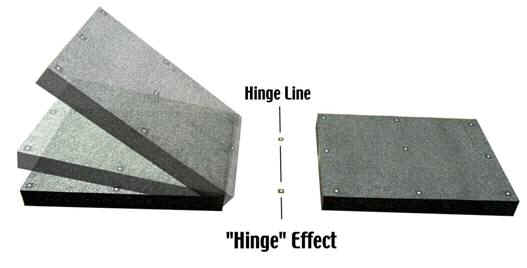
If we now add a third point in common between the two measurements that is away from the line (so the three points form a triangle), the "hinge" is now locked in place and the relationship between the two panels is established. Therefore, as a minimum, there must be three points, forming a triangle that is seen in common between the two sets of photography.
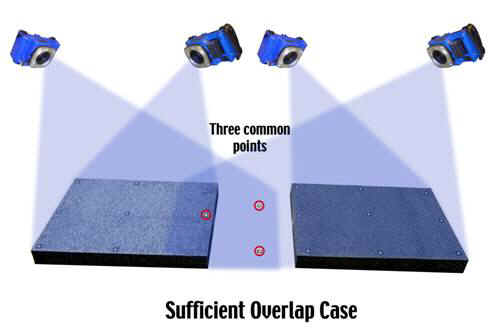
Of course, by adding more points and more overlap the tie between the two panels is more strongly established. The strongest tie between the two panels is established when all pictures see all of both panels; and we find ourselves back to the completely overlapping type of measurement.
Planning for Measurements
Planning for Different Types of Measurements
Some general guidelines can be given depending on the type of measurement. In general, whether a project is a completely or partially overlapping measurement determines the number and location of pictures. This part of planning is called the design of the measurement. On the other hand, whether a project is an initial or repeat measurement usually has no effect on the design of the measurement but instead determines the procedure usually followed to implement the design in the most efficient manner.
We first discuss design for completely overlapping measurements since these are the easiest type of measurements, and then discuss the design for partially overlapping measurements that are more complicated. After this we discuss the general procedures for the different types of measurements.
Design for Completely Overlapping Measurements
As in real estate, the three main considerations for completely overlapping measurements are location, location, and location. Since every photograph sees the entire object, the placement of the camera is usually the main concern. For the highest accuracy, the photographs should be taken from many different locations that produce good intersection angles to the points on the object. (See Measuring Accuracy for a description of how the number of photographs and geometry affect measuring accuracies). Often, however, the camera locations are restricted by the room around the object and/or by the shape of the object. Retro-reflective
targets often restrict the camera locations as well because retro-reflective targets cannot be viewed too obliquely or they become dim and unmeasurable.
The main considerations for design of overlapping measurements then are:
1. Try to see all targets from four or more different locations (for good accuracy andreliability).
- Try and keep camera intersection angles between 60° and 120° (for good accuracy).
- Try to keep angles to retro-reflective targets less than 60° (for good, bright target images).
To help illustrate the design for a completely overlapping measurement consider the measurement of a 2 meter by 1 meter flat granite surface plate with retro-reflective targets on its surface. The camera has a medium angle field of view lens so we will need to get about 2 meters above the surface plate to see the entire object. The key question is how many photographs should we take and from where to get high accuracy? To start off, let's consider two photographs taken on opposite sides of the plate.
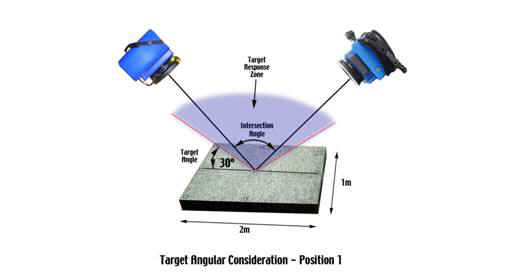
As we move the cameras further apart, two things happen. First, the intersection angles between the two cameras gets larger which is good since it helps improve accuracies, but also the angle to the retro-reflective targets also gets larger which is eventually bad since the targets will ultimately become too dim to be measured.
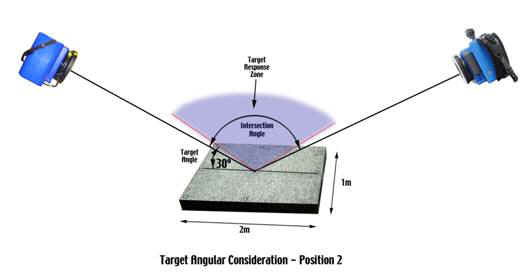
As a rule of thumb, a good compromise between quality of intersection angles and quality of target image is found by locating the camera so it makes a 45° angle with the center of the object. This also keeps the angle to the retro-reflective targets that are furthest away from the camera less than the limit of 60°. A nice thing about using an angle of approximately 45°to the center of the object is the camera location is easy to figure out; at 45°, the distance out from the center of the object is equal to the distance back from the object. We can now add more pictures all around the object as desired to increase accuracy.
Sometimes we can overcome the limitation caused by the retro-reflective viewing angle by using special targets instead of the regular, flat ones. For example, angled targets could be used at the edge of the plate, instead of flat targets to make the viewing angle more favorable. Also, several manufacturers make "tooling" retro-reflective targets that consist of a target that can be placed in a precision bushing and rotated to the best viewing angle. Of course, in both cases, the offset from the center of the target to the surface plate must be removed to get the measurement of the surface itself.
The shape of the object also has an effect on the camera locations. For example, if the object was not flat but instead concave (for example, the reflective surface of a parabolic antenna), the retro-reflective targets at the far edge of the object would point more favorably towards the camera and now the camera intersection angles can be larger to get more accuracy.
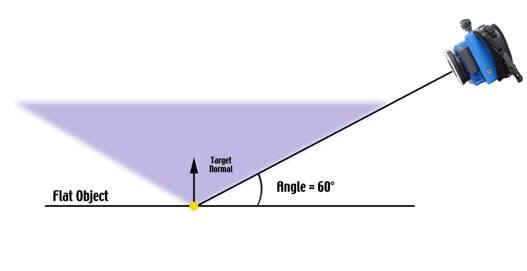
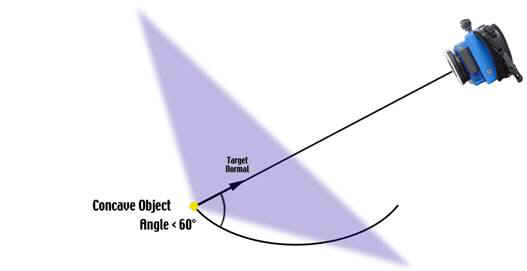
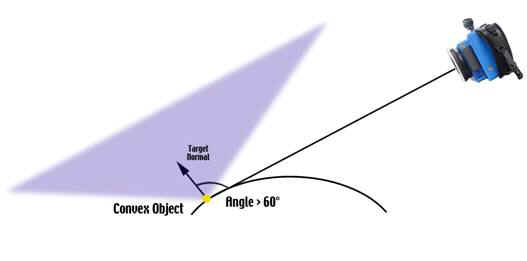
In addition, your plan must consider blockage. Remember, we want to try to see ALL targets from at least four different locations. If part of the object cannot be seen (for example, the antenna feed may block part of the surface), try to take extra pictures from other locations that see the blocked targets. However, it can often be difficult to get good geometry if the blockage is severe. (A good example of this is trying to measure targets at the bottom of a long, thin cylinder.) If blockage or other limitations limit the number of favorable views we can get of the object or a portion of the object, we can improve accuracy somewhat (10-20% typically) by taking another photograph from the same location. You can improve accuracy further (another 10-20% typically) by taking the photographs with the camera rolled at a different angle for each picture.
Design for Partially Overlapping Measurements
For partially overlapping measurements, you must still consider everything required in the planning for completely overlapping measurements. However, you must also design the measurement so there is enough overlap to tie the whole measurement together strongly enough to preserve the measurement accuracy. (See Completely or Partially Overlapping Measurements for a description of why overlap is needed, and for the requirements to connect a measurement together). Also, the fact that the entire object cannot be seen in every photograph usually means more photographs are needed than for completely overlapping measurements. Finally, because only part of the object is seen, it is easy to lose track of where you are and what points you are measuring. All of these factors combine to make the typical partially overlapping measurement more complicated than the typical completely overlapping measurement.
Partially overlapping measurements can seem complicated at first so we recommend you start out with a "divide and conquer" strategy for the measurement. First, divide the object into several logical areas (left, right, front, back, etc.) that can each be seen completely by a set of pictures. Then, add extra photographs (or targets) so that the separate areas are strongly connected. Often, you will find that there is enough partial overlap between the "separate" measurements that few if any additional photographs are needed. To help understand the process we describe below design strategies for some typical types of partially overlapping measurements. However, there is no substitute for experience so get out there and get started!
Design for "Left-Right" Measurements
Often, a relatively simple object that could be measured with complete overlap must be measured with partial overlap because there is not enough room around the object for the entire object to be seen in every photograph. (One might also do this to increase accuracy. See Measuring Accuracy and "How Accurate is V-STARS?" in FAQ (Frequently Asked Questions) for details on this technique).
|
For example, consider a rectangular room. To measure one of the long walls of the room you must get back against the other long wall, but the rectangular nature of the room does not allow you to get back far enough to see the entire wall. |
|
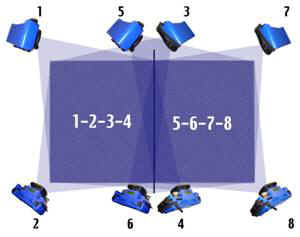
In this case, you can divide the object up into areas and use the techniques described in Design for Completely Overlapping Measurements to make sure you have designed an accurate measurement for each area. In this example, we have divided the wall into left and right halves and taken pictures from approximately the four corners of each half. Thus, each half is seen in four photographs from four different locations. This is fine so far, but notice that there is no common coverage between the two halves so the entire measurement is not connected. (In practice, you will usually have at least some common coverage in the middle, but for the sake of this example, we assume there is none).
|
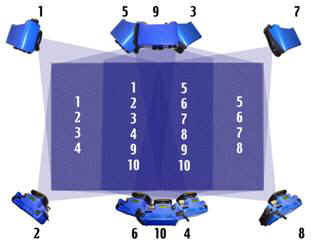
There are a couple of different ways to connect the halves together. First, we can take more photographs in the middle that are aimed right at the center of the wall. For example, we can take two pictures in the center of the wall; one at the top, and one at the bottom. These photographs see part of the left and right halves and serve to tie everything together. |
|
This first approach is fine and is easy to do because you do not have to move the camera to any new positions.
|
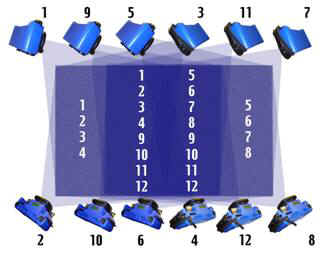
However, another approach is to further divide the wall into a "middle" half and shoot in the four corners of this area. Since this area now sees part of the left and right halves, the entire measurement is now connected together. Although this approach is a little harder than the previous one because you have to move the camera to these new positions, this approach is somewhat more accurate due to the greater geometric diversity. |
|
The approach to use depends on the requirements. If speed is of the essence, use the first approach. If accuracy is the primary concern, use the second approach. Of course, these techniques can be extended if the wall needs to be shot in more than two sections.
Design for "Front-Back" Measurements
|
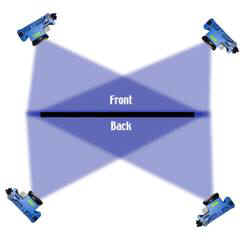
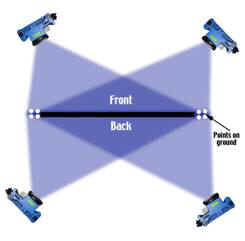
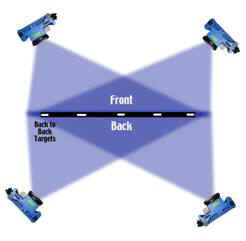
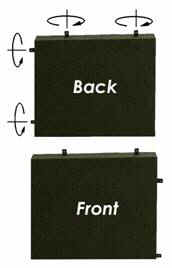
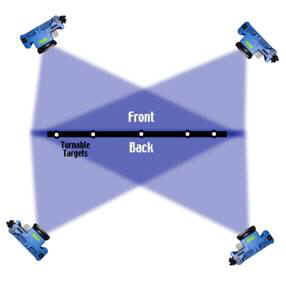
The measurement situation described in this section does not occur very often, but it helps illustrate the need for overlap and how to do it in a very tricky situation. Keep it in mind if you ever face a similar situation. The task is to measure the front and back of a thin panel. There is plenty of room around the panel so we can measure each side of the panel with complete overlap. However, the difficulty comes when we try to connect the front and back together. (If we do not have some commonality between the two sides we cannot say anything about the relationship of the front to the back, for example the thickness of the panel). We must now attach targets somewhere that are seen by both the front and back photographs. |
|
|
|
Usually eight to twelve well-distributed targets are all that is needed to provide a strong tie between the front and back.
One possible solution is to put targets on the fixture holding the panel or on the floor around the panel that can be seen from both sides. However, if the panel is not rigidly attached to the holding fixture or the floor, we cannot do this because these tie points must be stable with respect to the panel. Also, the viewable areas on the floor or fixture may not allow for a very good distribution of the tie points. Remember, just a line of common points is not sufficient.
|
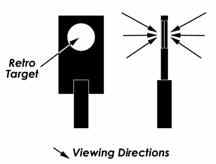
Another approach is to put targets on the edge or top of the panel that can be seen from both sides. However, this presents some difficulties. If the panel is too thin we cannot put the usual self-adhesive targets on the edge unless we mount them to a hard carrier that can then be attached to the edge. If the panel is steel the hard carrier could be magnetic; if it is not, glue can be used. Even if self-adhesive targets can be put on the edges, seeing them can still be difficult since they are now perpendicular to the front and back sides. One solution is to put so called "back-to-back targets" on the edges that consist of a carrier that attaches to the edge so the target is now parallel to the face of the panel. Then, the target consists of two self-adhesive targets placed back-to-back so the target is retro-reflective on both sides. |
|
|
|
The back-to-back target is mounted in the carrier so it is rigid and now the target can be seen from both sides. However, since the back and front of the target are not the same point (they are separated by the thickness of the two target surfaces which is about 0.2mm or 0.008") this approach should not be used when high accuracy is needed.
|
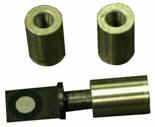
A better approach to use when high accuracy is needed is to use so-called "turnable targets". These are precisely made target carriers designed to be mounted in a precision bushing so they can be rotated. The target is constructed so the center of the target is at the center of rotation of the target carrier. |
|
The bushings can be attached to the panel edges and then right-angle targets are placed in the bushings. The targets can then be turned so they are parallel to the face being photographed. Because the target maintains the same location when rotated (within +/- 12 microns or 0.0005"), the targets serve as good tie points.
|
|
|
Design for "Box" Measurements
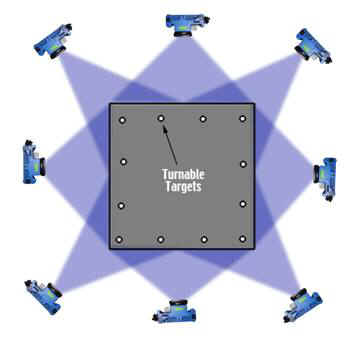
A common situation that requires partially overlapping measurement occurs when you must measure an object that has multiple sides. Usually, all the sides of the object cannot be seen in every photograph or at least cannot be seen from enough different locations to produce an accurate measurement. A good general example of this is having to measure all four sides (and sometimes the top and/or bottom) of a box shaped structure.
The approach is to first concentrate on each side of the box and treat it as a completely overlapping measurement. If the sides of the box are too large to be seen entirely, then you should still concentrate on each side of the box first. (See Design for "Left-Right" Measurements for how to measure a side of the box with partial overlap). After you have a good design for each side, we can turn our efforts to tying all the sides together. A typical design would be to take pictures that are located back from each corner of the box. In some cases, a photograph from each corner will be able to see two complete sides of the box and in this case, the tie is easily established. In other cases, the photographs may not be able to see both sides completely (depending on blockage, the size of the box, the camera field of view and the targeting), and additional photographs will need to be taken (perhaps low and high photographs at the center of each side). If desired, you can also take two pictures at each location with the camera rolled 90° between photographs; this will increase accuracy. The key is to try to have all points in at least four different photographs, and to have strong connections between all the separate areas.
|
Even if you are not measuring the top of the box, you may find it very useful to add targets here since these may very well be seen from many different locations around the box. This will tie all the photographs together very strongly. One problem with this though is you may have difficulty seeing flat targets placed on the top surface. In this case, you will find it useful to again use turnable, right angle targets. |
|
They would be placed in bushings that are attached to the top surface. You can then turn these to face the camera as you go around the box.
Procedures for Different Types of Measurements
We generally classify measurements as one of four types. Measurements can be initial or repeat and can be completely or partially overlapping. These two categories are not mutually exclusive so we can have four different types of measurements.
These are:
1. Repeat, Completely Overlapping (generally the easiest type of measurement)
2. Repeat, Partially Overlapping
3. Initial, Completely Overlapping
4. Initial, Partially Overlapping (generally the hardest type of measurement)
Although all these different types of measurements have much in common, there are some differences. First, the AutoBar
is required for initial measurements and not usually needed for repeat measurements. Coded targets
are usually used on both initial and repeat measurements so you can completely automate the measurement. The V-STARS Tutorials shows how the AutoBar and Coded targets are used on initial and repeat measurements. If you use the AutoBar on a repeat measurement, it must be put in the same location it was on the initial measurement. If the AutoBar is left attached to the object, this is usually no problem, but if the AutoBar was removed, it must be placed back in its original position. Often, an alignment fixture of some sort can be used to help accomplish this.
Scale bar
(s) are generally required on initial measurements if good scaling of the object is needed (see FAQ about scale and its use). Scale bars may not be needed on repeat measurements. If some of the points on the object do not move from measurement to measurement (points on a stable frame holding the object for example), they can be used as scale points. If scale bars are used, it is helpful if you can put them back on the object in nearly the same location as before, but this is not necessary.
|
Type of Measurement |
AutoBar |
Coded Targets2 |
Scale Bar(s) |
|
Repeat, Completely Overlapping |
Optional1 |
Required |
Optional |
|
Repeat, Partially Overlapping |
Optional1 |
Required |
Optional1 |
|
Initial, Completely Overlapping |
Required |
Required |
Required |
|
Initial, Partially Overlapping |
Required |
Required |
Required |
1 AutoBar
must be placed back in original location.
2 So the measurement can be completely automated.
Final Planning Tips
On complex objects with many points, it is easy to lose track of where you are and what points you are measuring. You can make things easier by labeling or otherwise identifying some key points on the object. Retro-reflective
labeling materials are available to help with this task. Taking the photographs in a regular, ordered pattern when possible and keeping a log of the pictures can also help keep things straight on complicated projects.
Although we have provided some general guidelines for different types of measurements in this explanation, there is no substitute for experience. Try to start out doing some simple completely overlapping measurements, and then do some measurements of relatively simple objects that do not need much overlap or many photographs. Finally, you can try measurements of more complicated objects. Do not forget to use the V-STARS Tutorials to help your learning and understanding.
Planning Summary and Checklist
We have prepared the checklist below to help with project planning. We strongly recommend you use it on every project until you know it by heart. You should even add to it or modify it to suit your needs.
V-STARS Planning Checks:
1. Triangulation
Requirements
a. Need two different sightings of every point (prefer four as a minimum).
b. Need good intersection angles between points (60-120° is good).
2. Resection
Requirements
a. Need to see the AutoBar
or 4 known points in every picture (points cannot be in a line).
b. Need at least 12 well-distributed points on every photo (but twenty is better).
3. Self-Calibration
Requirements
a. Need to roll camera by 90° (at least once, more is better).
b. Need at least four to six photographs (four if not flat, six if flat).
c. Need photographs from at least three different locations.
d. Need at least twenty well-distributed points in the entire measurement (but forty is better).
4. Overlap Requirements (only needed if entire object is not seen at once)
a. Need at least three common points for adjacent sections (but more is better).
b. Common points cannot be in a line (triangle or better).
5. Scale Requirements (only needed if accurate scaling is needed)
a. At least one known distance available (prefer at least three)
b. Scale distance is as long as practical
Targeting
Introduction to Targeting
Before taking pictures, you must target the object. This includes targeting the points of interest and applying the AutoBar and scale bar(s) if they are used. Remember that V-STARS never measures the object directly but instead measures the center of the retro-reflective target. By placing the target on or in a known relationship to the point of interest, the point can be measured. Sometimes it can be difficult to target the point you want to measure directly. Fortunately, many different types of retro-reflective targets have been developed to help solve this problem.
Retro-reflector Targets and their characteristics
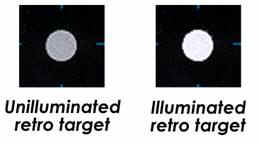
The V-STARS system measures special targets made of a thin (0.11mm/ 0.0044" thick), flat, grayish colored retro-reflective material.
|
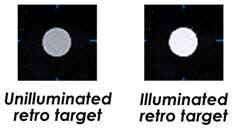
Retro-reflectors reflect light very efficiently back to the light source. For example, they are typically 100 to 1000 times more efficient at returning light than a conventional white target. (The retro-reflective material used for targets is similar in principle and operation to highway reflectors but is far more efficient.) |
|
A low-power flash located at the camera is used to illuminate the targets. The resulting target images are very bright and easy to find and measure. In addition, because the targets are illuminated completely by the flash, the target exposure is independent of the ambient illumination. Pictures can be taken in bright light or total darkness and the target exposure will be the same. This feature makes target exposure very easy. See Target Exposure section for details on exposing retro-reflective targets
enhancement features available in V-STARS to enhance the object. See Background Exposure
section for details on exposing the background.
Target Angle
|
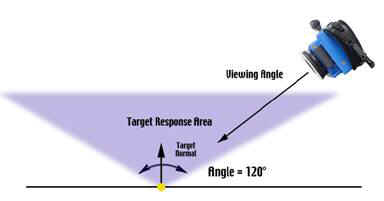
Although retro-reflective targets have several advantages over conventional targets they tend to lose their special reflective properties when viewed at steep angles, becoming dim and unmeasurable. |
|
For best results, the targets shouldn't be viewed from more than 60 to 65° off-axis.
Target Thickness
In some measurements the target thickness may need to be removed to get the location of the point of interest. Retro-reflective
targets are physically 100 microns (0.004") thick but what really matters is the optical thickness. The optical thickness depends on whether the target is masked (has a black background around the retro-reflective material) or unmasked (has no background). Masked targets have an optical thickness of 110 microns (0.0044") and unmasked targets have an optical thickness of 63 microns (0.0025"). The optical thickness should be taken into account and removed when necessary.
Generally most CAD programs can automatically remove target thickness when CAD modeled surfaces are measured. In most other cases it is necessary to have a local plane available to define the direction in which the offset should be compensated.
Target Sizes
The target size must be large enough to be measured accurately. For an accurate measurement, the target image should be at least 3 pixels wide and 3 pixels high. The appropriate target size for a measurement depends on several factors. These include the distance from the camera to the object, the resolution of the camera you are using, the lens focal length, and the target exposure. V-STARS has been designed to measure the standard size targets used throughout industry over a wide range without losing accuracy.
A convenient rule of thumb to use for target size is that the target diameter should be at least 1/1000th of the object size (or one millimeter per meter). For example, if the object is 3 meters (10 feet) in size, the target should be at least 3mm (1/8") in diameter.
If you are shooting an object in sections, then the minimum target diameter should be 1/1000th times the average size of the sections you are photographing.
Although V-STARS can accurately measure targets of this size, we recommend using targets that are twice the minimum size since they will be easier to find and measure. The rule of thumb described above is fast and easy to use, and is fine for most circumstances. The diagram below is useful in helping you determine what target size to use with an INCA camera.

The diagram below is useful in helping you determine what target size to use with a D1 camera. Due to the smaller format of the D1, targets have to generally be about 50% larger.
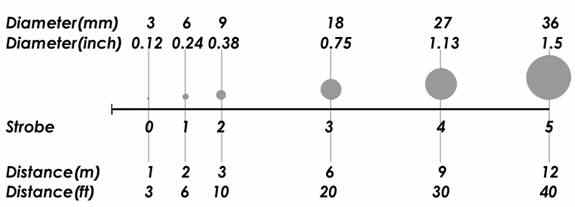
For best results, always use the same or similar size targets on a given measurement. Target sizes which vary by up to 2 to 1 in size, generally are acceptable.
Target Types
Many different types of retro-reflective targets are available. These include:
Individual self-adhesive stick on targets
These targets are available both masked and unmasked. Masked targets have a black mask that surrounds the retro dot. This improves the contrast and makes the target easier to handle and apply. Masked targets can also have alignment marks added to the edges so the center of the target can be precisely aligned with scribe lines. In other examples they have small black dots in the center so theodolites can measure them as well. The targets come in various sizes.
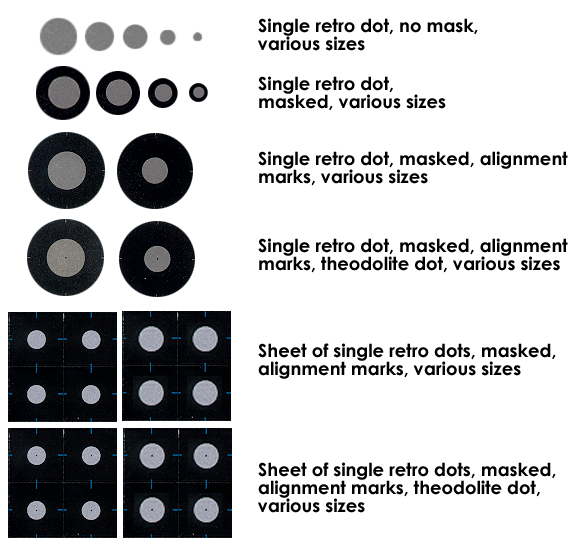
In general, you should avoid mixing masked and unmasked targets on the same job because they have different optical thickness.
Target Tape
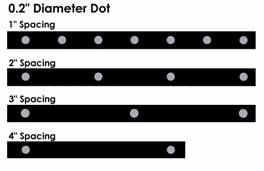
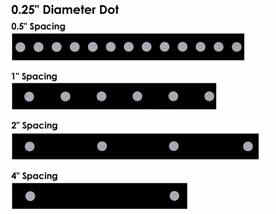
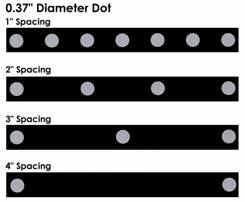
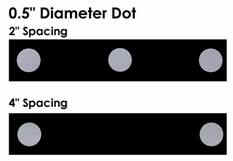
This is a continuous roll of self-adhesive black tape with retro-reflective targets at regular intervals. This material is especially useful for measuring surfaces since it is much faster to apply (and remove) than individual targets. Tape is available with different target sizes and intervals. Some typical examples are shown below.
|
|
|
|
|
|
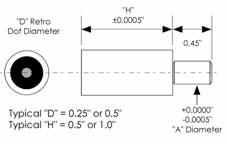
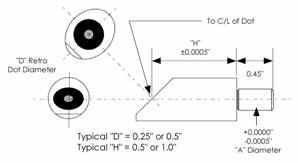
Hard-body tooling targets
precision bushing they can be turned towards the camera without losing accuracy.
Spherical hard-body targets are also available. These targets are similar to the hard-body tooling targets above but the retro-reflective target is spherical so the target does not need to be turned. Unfortunately, these targets are not as accurate as the hard body tooling targets (they are accurate to 100 microns or 0.004") but they are especially useful as a substitute for turnable targets when the target is hard to reach.

|
|
|
|
|
|
|
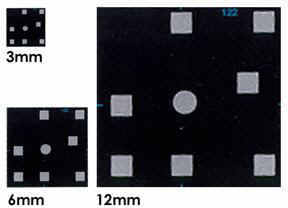
Coded targets
are a special type of target that the V-STARS software can recognize and automatically decode. Each code is made up of a unique pattern of squares and a central dot. Currently there are 132 coded targets available. Coded targets come in 3mm, 6mm and 12mm dot sizes. |
|
Target Handling and Care
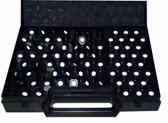
Retro-reflective
targets are very tough and durable, however they must be handled and cared for properly to ensure that the highest measuring accuracy is obtained.
Instructions for handling and care are:
1. Visually inspect targets before use for any dirt, dust or damage. (You can use a strong flashlight to help illuminate the target and make the visual inspection easier). If the target appears dirty you can clean it (see below for cleaning instructions). If it is damaged (usually by contact with a sharp or abrasive object), you should not use it. A damaged target will not have a uniform appearance but will appear to have voids or dark areas where the target has been damaged. Damaged targets should be marked as bad to prevent accidental use. Placing a line through the target with a red marker is one way of signalizing a target that is bad.
|
|
|
|
|
Missing retro (dead spot) |
Target Scratch |
Target marked as bad |
1. Avoid touching the retro-reflective material since the natural oil and dirt from your hands can hurt the retro-reflective effect and make the target dim and unmeasurable.
|
|
|
|
|
WRONG |
RIGHT |
RIGHT |
|
3. You should store the targets in a clean, dry area (inside a sealed storage container is best). 4. You cannot use retro-reflective targets when they are wet since the water changes the index of refraction and destroys the retro-reflective effect. Dry targets by rubbing or dabbing them gently with a cloth or tissue and allow them to dry. |
|
|
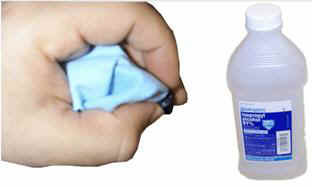
5. Use masking tape to lift off dirt and grim from the target. If this is not effective, clean targets with rubbing alcohol or denatured alcohol by gently rubbing the retro-reflective material with an alcohol dampened cloth or tissue. Be sure to let the target dry completely before you use it. |
|
Do not use acetone or similar solvents or the target may be permanently damaged.
Attaching the AutoBar
glue gun provided with the system to glue the AutoBar to the object. Whenever possible, the AutoBar should be placed so it is easy to see and not blocked by the object. Usually placing the AutoBar somewhere in the middle of the object is best but is not necessary. In addition, the AutoBar should not block other target points.
If an AutoBar
is moved during the measurement, you can usually still continue the measurement but you can no longer use the AutoBar.
The standard size AutoBar
provided with the system can be used at a range of up to 10 meters (33 feet). For larger distances, a larger AutoBar can be used. Some larger sizes are available from GSI.
If you are going to use the AutoBar
for a repeat measurement, it must be placed back in the same location it was in for the initial measurement. If the AutoBar has not been removed, this is usually not a problem. If the AutoBar has been removed, you will usually need to design some sort of fixture that allows you to return the AutoBar to its original location.
Attaching the Scale Bar(s)
Scale bar
(s) provide precise distance information so the measurement can be scaled correctly. However, not every measurement needs to use scale bar(s). For example, scale information may be available by using the known distances between some stable points on the object. Or, the nature of the application may not need scaled measurements. If the AutoBar
is present, it can be used as a scale bar when only nominal scale is needed. (The AutoBar is too small to be used as an accurate scale reference).
Using Scale Bar(s) on a measurement is very similar to using the AutoBar . You must rigidly attach the scale bar(s) on or near the object so they do not move with respect to the object throughout the measurement. Scale bar points are like any other points; they only need to be seen from two different locations (and might not to see both ends of the scale bar on each photograph). However, since these points are used to scale the measurement, you should try to see them from as many locations as possible. Try also to place the scale bars so they do not block other targets. For best results, scale bar targets should be at least as large as the other targets. See Target Sizes for the correct target size. Also, see the questions in FAQ regarding scale for more details on using scale bar(s). Also, see Scaling Photogrammetry .
Targeting Summary and Checklist
Targeting Checklist
We have prepared the checklist below to help with targeting. We strongly recommend you use it on every project until you can remember it. You should even add to it or modify it to suit your needs.
1. Check target angles (No more than 60° off-axis)
2. Avoid touching retro-reflective material.
3. Inspect Targets Before Use
a. Make sure targets are clean and undamaged.
b. If necessary, clean gently with alcohol.
4. Do not use targets when wet.
5. Select proper target size (recommend 1/500th of object size).
6. AutoBar
a. Standard bar is good for ranges less than 10m.
b. Attach rigidly to object.
c. Put in highly visible location.
7. Scale Bar(s)
a. Attach rigidly to object.
b. Put in highly visible location.
Glossary
AutoBar
|
The AutoBar
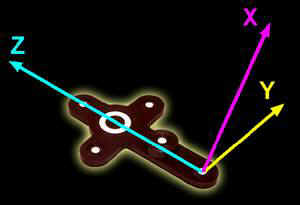
provided with the V-STARS system is a fixture with five targets arranged in the form of a cross. The target's known coordinates are used by GSI's AutoStart
procedure to determine the camera's orientation relative to the AutoBar. The AutoBar is securely attached on or near the measured object, preferably in a highly visible location. |
|
The AutoBar 's default coordinate system has its origin at target1 at the bottom of the AutoBar. The positive Z axis goes thru point 3 at the top of the bar. The positive X axis is up out of the AutoBar.
AutoStart
The procedure used in V-STARS to get the preliminary orientation (location and aiming) of each photograph taken in a measurement. In order to AutoStart
, one must merely measure four target points with known X, Y, Z coordinates. The only requirement is that the four points should not lie on a line. AutoStart is often used in conjunction with the AutoBar
provided with the V-STARS system to make measurements fast, easy and automatic.
CMM
Abbreviation for Coordinate Measuring Machine. A widely used family of machines that make 3 dimensional measurements of objects. Typically, the machine has a head with a measuring tip attached to it that can be moved around in a 3-dimensional space (usually the head is attached to rails and a gantry. The location of the head is encoded so that everywhere it touches the object the 3-dimensional coordinates are measured.
Coded targets
|
Coded targets
consist of a central circle surrounded by a pattern of squares. The different pattern of squares around each target uniquely identifies that target. When used properly, coded targets allow measurements to be done completely automatically. |
|
Coded target nuggets
Coded target nuggets are the square that surround the central dot in a coded target.
Driveback
When approximate coordinates are available for all or some of the target points on a measurement, they can be measured automatically. After the photograph is oriented (using the AutoStart
or SuperStart
procedures), V-STARS converts all X,Y,Z target coordinates into predicted x,y image coordinates and then searches for the target in that area.
Field of View
|
The camera's field of view defines how much it sees and is a function of the focal length of the lens and the size (often called the format) of the digital sensor. For a given lens, a larger format sensor has a larger field of view. Similarly, for a given size sensor, a shorter focal length lens has a wider field of view. |
|
Focusing
The range of acceptable sharpness is called the depth of focus. The depth of focus of a lens is a function of many factors, including: the focal length of the lens, the format size, the distance from the camera to the object, the size of the object, and the f-number of the lens.
V-STARS has been designed so that images will be in acceptable focus for points between 0.5 meters (20 inches) and 60 meters (200 feet) from the camera. Fixing the focus effectively eliminates the depth of focus problem
F-number
The F-number is the ratio of the lens focal length to the diameter of the lens iris. The f-number provides an indication of the light sensitivity of the lens. The lower the f-number, the more light sensitive the lens is. However, lower f-numbers also reduce the depth of focus.
Flash Synchronization
The camera's flash must fire at the same time that the camera's shutter is completely open or else the retro-reflective targets will not be exposed.
Free-format
Free-format
fields do not have to occupy any particular columns of the record. Each field simply must end with a blank or comma or tab character. A free-format field may also have any number of leading blanks.
Orientation
Orientation
is the term used for the cameras position and aiming in space. The orientation of a camera is defined by its coordinates (X,Y,Z) and by its aiming direction (defined by three angles). GSI's AutoStart
and Resection
procedures are used to accurately determine the camera's orientation.
Photogrammetry
Photogrammetry , as its name implies, is a 3-dimensional coordinate measuring technique that uses photographs as the fundamental medium for metrology (or measurement). Photography describes the photographic principles involved in photogrammetry, while Metrology describes the techniques for producing 3-dimensional coordinates from two-dimensional photographs.
Resection
Resection
is the procedure used to get the final position and aiming (called the orientation) of the camera when a picture is taken. Typically all the points that are seen and known in XYZ in the image are used to determine this orientation.
Retro-reflective
|
A property which causes light to be reflected very efficiently back to the light source. The retro-reflective targets used by V-STARS act much like highway reflectors but are much more efficient. By using a low-powered flash located at the camera to illuminate the targets, the resulting target images are very bright and easy to find and measure. |
|
RMS
Root-Mean-Square - a statistical measure of the dispersion or spread of a group of data. The name comes from the fact that the RMS
is equal to the square Root of the Mean (average) of the sum of Squares of the values in the data set. With regards to resections, the RMS provides a measure of the quality of the resection.
Scale bar
A fixture that has two or more targets with known distances. The distance(s) between the target(s) are used to scale the measurement.
SuperStart
The SuperStart
command will open the picture and complete the following processes:
1) Scan image for potential targets
2) Determine whether an AutoBar
is present
3) Identify any codes that are present.
4) Use the known (coordinated) coded targets and AutoBar
found to determine the location in space (resection) of the image.
5) Driveback
to any points in the Driver file.
Theodolite
A precise angle measuring instrument. It consists of a sighting telescope which can be moved in azimuth and elevation. The azimuth and elevation angels are very precisely encoded. Using two widely separated instruments operators can sight through the telescopes on a common point and produce the 3-dimensional coordinates of the point by triangulation.
XYZ File
Each record of an XYZ file has a valid Point Label followed by the point's X, Y and Z coordinates. Sometimes, accuracy estimates for the point in X,Y and Z may also be included, but these are not used by V-STARS. The format for an XYZ file is shown below.
|
Point Label |
Point Coordinates (X,Y,Z) |
Point Accuracies (X,Y,Z) |
Examples of some records are given below:
|
POINT1 |
12.5122 |
-2.2231 |
3.4456 |
0.0012 |
0.0010 |
0.0018 |
|
REF22 |
-1.3132 |
3.5932 |
5.3768 |
0.0004 |
0.0008 |
0.0003 |
|
LINE1 |
19.5422 |
-6.8776 |
2.7896 |
0.0022 |
0.0015 |
0.0005 |
All the fields are free-format.

